RV ownership rewards self-reliance until the moment it punishes it. The same wrench-it-yourself instinct that keeps a coach affordable on routine maintenance becomes a liability the second the job crosses into propane, hydraulics, lithium, or chassis territory. Most DIY catastrophes on customer rigs trace to one of those four system tiers, and the bill to undo the damage often runs 5 to 10 times the original labor quote.
This guide names the five jobs A1 RV Repair sees most often as "owner-attempted, now needs the pro" callbacks. None of these are about gatekeeping the trade; they are about the specific risk math that makes hiring out cheaper end-to-end. The decision flow at the end works for any repair task on the rig.
Job 1: RV propane system work (regulators, lines, leak tests)
RV propane is the single most regulated system on the coach for a reason. Liquefied propane ignites at a 2.4 percent air-to-fuel mixture, and the failure mode at that mixture is detonation, not a slow burn. A leaking propane line under a coach with one spark from a refrigerator igniter is enough to take the entire rig down to the chassis.
Every state in the A1 RV Repair coverage area (Florida, Texas, Idaho, Oklahoma, Washington) regulates propane work under either state-level technician certification rules or RVIA-equivalent standards. RVIA propane certification is the credential that insurance and warranty carriers actually accept. Owner-performed propane work voids most coach insurance policies on subsequent fire or explosion claims.
The work itself is also unforgiving of small mistakes. A regulator that is set 0.5 PSI off causes appliance soot buildup that destroys the cooling unit on an absorption fridge in one season. A pipe-thread joint sealed with the wrong compound (PTFE tape rated for water, not for gas) leaks for months before detection. LP gas service from a certified A1 RV Repair tech runs $185 to $345 per call and includes a written leak-test record that insurance accepts immediately.
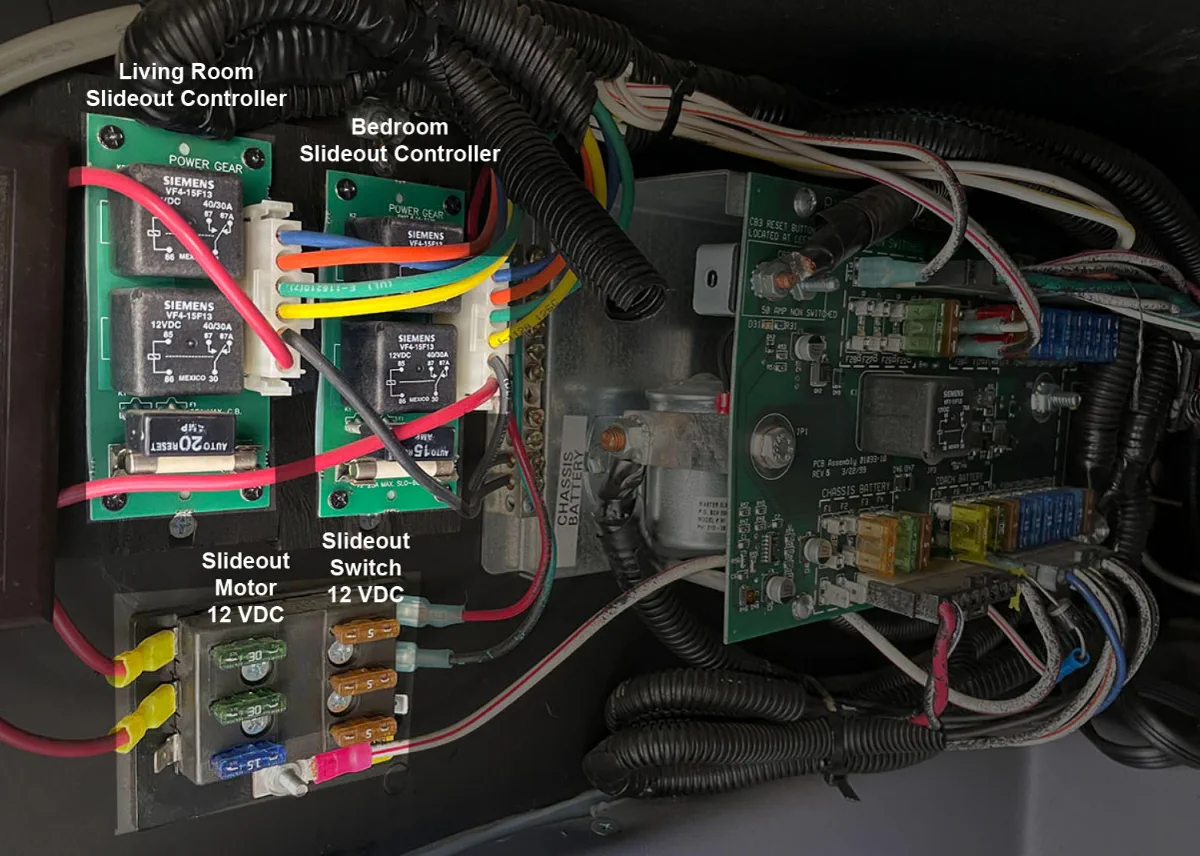
Job 2: RV slide-out mechanism replacement (Lippert, Schwintek, Power Gear)
Slide-out motors look replaceable. Owners watch a YouTube video, order the part, swap the motor in 90 minutes, and run the slide successfully for the first three cycles. The damage shows up at cycle 5 to 10 when the new motor was installed without proper timing, and the gear pack tears itself apart trying to compensate.
The torque and alignment specs on a Schwintek or Lippert slide system are tight enough that even certified techs use printed reference sheets at the truck. Schwintek motors require simultaneous timing on top and bottom motors within a 1/8-inch tolerance, and a misaligned install produces the corner gap that destroys the gear pack within weeks. A1 RV Repair sees this failure roughly twice a month from owner DIY attempts.
The cost math is brutal. A certified Schwintek motor replacement by an A1 RV Repair tech runs $485 to $895 and includes timing calibration plus a 30-day labor warranty. A botched DIY install plus the secondary gear pack and rail damage that follows runs $2,400 to $3,500. The labor savings on the first attempt is roughly $250 against a $2,000 downside.
The decision rule is simple. Slide-out lubrication, manual override testing, and sync controller cleaning are fair DIY territory. Motor replacement, gear pack rebuild, hydraulic seal work, and full mechanism swap belong to a certified tech. The line is whether the procedure has timing or torque calibration steps; if yes, hire it out.
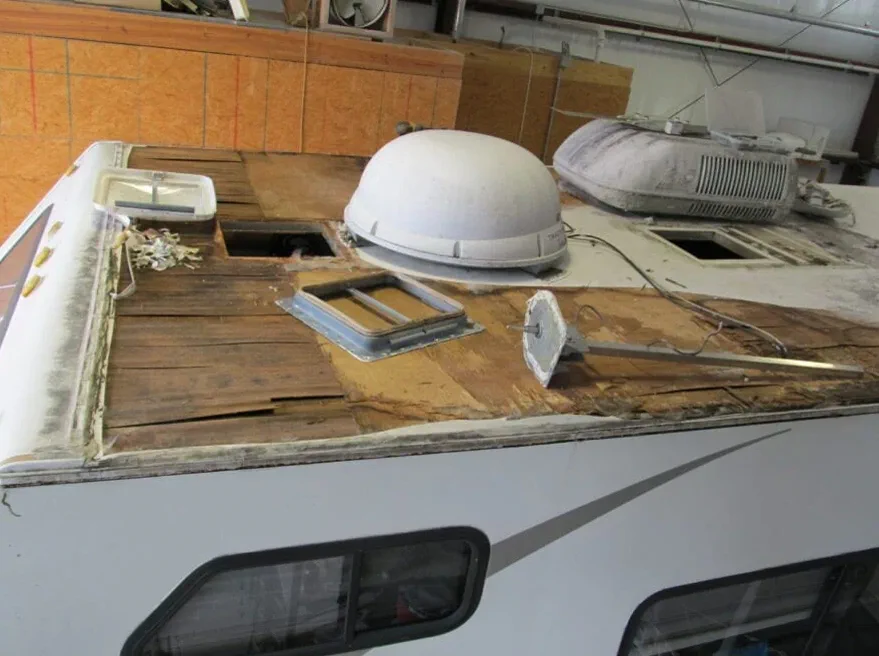
Job 3: Full RV roof reseal on TPO, EPDM, or fiberglass membrane
Spot sealant touch-up at a single vent or seam is reasonable DIY work for a careful owner. A full perimeter reseal across every penetration on a 30-foot coach is not, because one missed seam pushes water into the substrate where the damage is invisible until walls or ceiling panels start to delaminate. The owner who saves $700 on the DIY reseal often pays $4,000 to $9,000 in substrate replacement two seasons later.
The work is also detail-heavy in a way that does not reward speed. A proper full reseal pulls every fastener cover, inspects the underlying lap sealant, removes degraded sealant down to clean substrate, primes per Dicor sealant specifications, and applies fresh sealant in a continuous bead with no air gaps. Most DIY attempts skip the priming step, which is why the new sealant releases within 18 months.
Material-specific rules add another tier. TPO and EPDM membranes accept different sealants. Fiberglass roofs require different primers from rubber roofs. The EPDM Roofing Association publishes the material compatibility chart that certified techs work from. A1 RV Repair full roof reseal service runs $650 to $1,400 and includes material verification before the first bead drops.
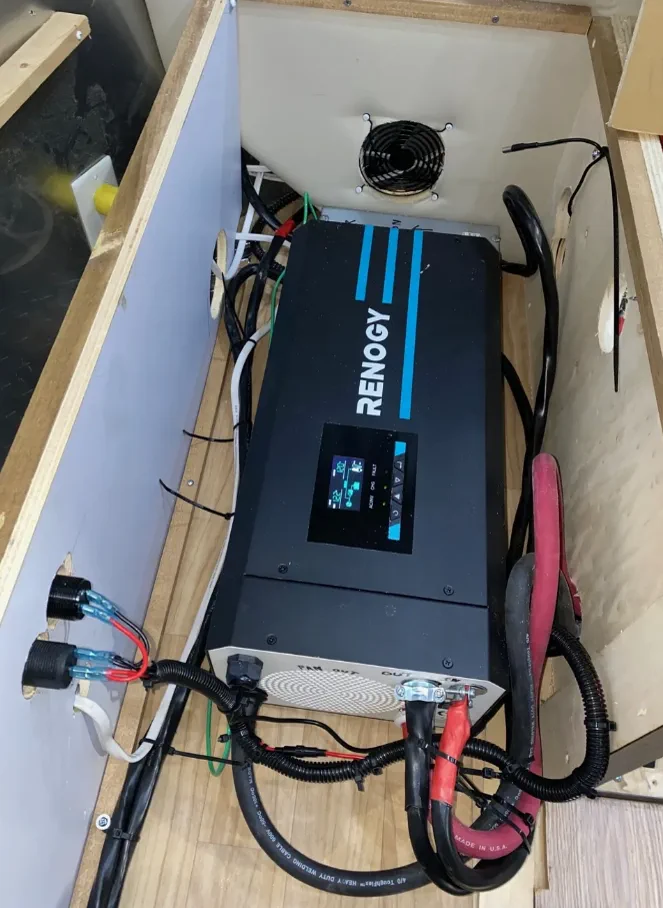
Job 4: Lithium battery bank wiring and BMS installation
Lithium-iron-phosphate (LFP) batteries from Battle Born, Victron, and Renogy have transformed RV electrical capability, but they are also the most demanding install on the modern coach. A loose lithium connection arcs at 14.4 volts and can ignite the battery enclosure within seconds. The fire-risk profile is enough that most coach insurance policies exclude fire damage from owner-installed lithium without RVIA documentation.
The system stack also runs deeper than most DIY installers realize. A proper lithium retrofit pairs the battery with a compatible charge controller, an isolator that disconnects the alternator from the lithium bank during regeneration, a bus-bar layout that handles the LFP discharge curve, and torque specs at every cable termination. Skip any of those and the install either fails to charge correctly or produces a fire hazard at the inverter.
Tooling matters too. A real lithium install uses a calibrated torque wrench at the bus bars, a TRMS multimeter for current verification, and a thermal camera at the connection points after the first 30-minute load test. The tooling alone runs $400 to $700 to acquire, which is most of the labor savings on a single install. A1 RV Repair lithium battery install service runs $1,200 to $2,800 inclusive of bus bars, isolator, and BMS configuration.
Insurance and warranty treatment is the deciding factor. Battle Born, Victron, and Renogy all require RVIA-installed or manufacturer-certified-installer paperwork for warranty registration. Without that paperwork, the lithium bank itself carries no warranty when it fails. The owner who saves $1,800 on installation also forfeits the $4,200 lithium-pack warranty.
Job 5: RV chassis brake, suspension, and bearing service
RV chassis brakes carry 12,000 to 30,000 pounds of GVWR depending on coach class, and the consequences of a brake failure at highway speed are catastrophic. A Class A motorhome on the wrong brake pad, an over-torqued or under-torqued wheel bearing, or a leaking brake line at the rear axle each have the same end state: the coach does not stop, and the people inside it die.
The U.S. Department of Transportation regulates RV chassis service under FMCSA commercial vehicle standards for any rig over 26,001 pounds GVWR. Tools, torque specs, and procedure documentation are non-negotiable. A certified A1 RV Repair brake service runs $385 to $895 and includes axle weight verification, brake stroke measurement, and a written DOT-compliance record.
The DIY case for chassis work is also weaker than for any other system on the coach. Tow trucks for a disabled coach in Stuart, Dallas, or Seattle run $4 to $8 per mile and frequently exceed $1,000 on a Class A. A failed wheel bearing on a remote highway turns into a $2,400 tow plus $1,800 in repair within the same week. The cost case never pencils.
What RV repairs ARE fair DIY territory?
The five jobs above cover roughly 20 percent of typical service tickets. The other 80 percent of RV maintenance is fair DIY work for an owner with basic tooling and patience. Spot sealant touch-up, fuse and bulb replacement, water filter swap, tire pressure checks, and basic interior repairs (cabinet hinges, drawer slides, window blinds) are all reasonable.
Maintenance work that prevents the expensive failures is also good DIY territory. Lubricating slide rails, awning hardware, and leveling jack stems every spring keeps the certified-tech repair calls down by 40 to 60 percent over the life of the coach. Cleaning tank sensors, flushing the gray and black tanks, and rotating tires off-pattern are all DIY-appropriate.
The decision rule is consistent across every RV repair task. If the procedure has propane, lithium, high-voltage, hydraulic, or chassis-safety elements, hire it out. If it has torque or alignment calibration steps, hire it out. If it touches a coach warranty or an insurance-excluded system, hire it out. Everything else is fair DIY territory.
| Task | DIY okay? | Hire-out cost (2026) | Why |
|---|---|---|---|
| Propane regulator or line work | No | $185 - $345 | Safety hazard; certification required for insurance |
| Slide motor or gear pack replacement | No | $485 - $1,100 | Timing tolerance destroys secondary parts |
| Full TPO or EPDM roof reseal | No | $650 - $1,400 | One missed seam rots substrate invisibly |
| Lithium battery bank install | No | $1,200 - $2,800 | Fire risk; warranty voided without paperwork |
| Chassis brake or bearing service | No | $385 - $895 | DOT regulated; safety-of-life system |
| Spot sealant touch-up (one seam) | Yes | $185 - $350 | Low risk; easy to verify visually |
| Water filter or pump swap (same fitment) | Yes | $185 - $295 | Plumbing fittings forgive minor errors |
| Fuse, bulb, or basic light fixture | Yes | $125 - $185 | 12V circuits; low energy density |
| Slide rail and awning lubrication | Yes | $95 - $175 | Preventive; reduces future failures |
| Cabinet hinge or drawer slide repair | Yes | $125 - $245 | Cosmetic; no system risk |
How do I tell if a job is really DIY-safe?
Five questions before any RV repair attempt decide the call. Question one is whether the job involves propane, lithium, high voltage above 50V, hydraulic systems above 1500 PSI, or chassis brakes. If yes, hire out.
Question two is whether the coach is under factory or extended warranty, which most owner repairs void on the covered system. Question three is whether the repair touches an insurance-excluded category (propane, electrical, roof) where DIY workmanship triggers claim denial.
Question four is whether the procedure requires a torque wrench, DOT-rated tooling, a calibrated TRMS multimeter, a heat gun above 600 degrees Fahrenheit, or a hydraulic press. If you do not own and maintain the tool, hiring out is cheaper than buying it for one job. Question five is whether the procedure has timing, alignment, or calibration steps. Multi-step assemblies with calibration are the highest-risk DIY targets.
Pass all five questions cleanly and the job is fair DIY territory. Fail any one and the math favors a certified A1 RV Repair tech. Owners in Vero Beach, Austin, Boise, and Seattle all get the same flat-rate phone quote before dispatch.
What does an A1 RV Repair mobile call actually include?
A typical A1 RV Repair mobile dispatch lands at the coach within 2 to 4 hours on same-day service in covered metros, with a labor rate of $135 to $165 per hour, a $75 trip fee inside the 25-mile radius, and parts at standard retail markup. The tech arrives with a stocked service truck, a calibrated torque wrench, a TRMS multimeter, and the OEM parts catalog for Lippert, Schwintek, Dometic, Onan, and Pentair Shurflo.
Every invoice includes RVIA-compliant documentation: photos before and after, OEM part numbers, line-item labor with time stamps, and a written cause-of-loss statement for any insurance-eligible work. That documentation is what makes the difference between a paid warranty or insurance claim and a denial. Mobile RV repair cost in 2026 walks through the full fee structure.
The pricing context matters. A1 RV Repair sits at the certified-mobile mid-range, well above uncertified handyman labor and well below premium-coach specialists. That band is where most warranty and insurance work clears cleanly. Storm damage claim work is the highest-leverage example of certified documentation paying back the labor cost many times over.
Where does A1 RV Repair handle the hire-out jobs?
A1 RV Repair runs same-day or next-day mobile dispatch across Florida, Texas, Idaho, Oklahoma, and Washington, with the same flat-rate phone quote and the same RVIA-compliant documentation in every market. Coverage spans coastal Florida from Stuart through Fort Pierce and the Treasure Coast, Texas metros from Austin through Dallas, the Treasure Valley in Idaho, and the Puget Sound corridor from Seattle south through Tacoma.
Related guides walk through specific service categories in more detail. RV roof types compared covers the material identification that decides reseal procedure. Slide-out fix vs replace walks through the decision tree before any slide call. Is a lithium upgrade worth it covers the cost-payback math before the install. Solar payback and water pump diagnostics cover the most-DIY-able of the electrical and plumbing categories.
For seasonal timing, best time of year for RV roof repair and state-specific winterization cover the prevention work that keeps the hire-out jobs to a minimum.