Timing decides whether an RV roof repair lasts a decade or peels in six months. Sealant chemistry, membrane temperature, and the dry window between storms all favor specific calendar slots, but the right slot depends on where the rig is parked. A May reseal in Boise is perfect; the same May reseal in Fort Pierce drops onto a roof during the run-up to thunderstorm season.
Best months for RV roof repair by region
The biggest mistake owners make is treating RV roof repair timing as a universal calendar. Climate region shifts the optimal window by 4 to 8 weeks in either direction, and in some regions the standard "May through September" advice is exactly the wrong call.
The table below maps the eight U.S. climate regions A1 RV Repair services to their best months, the months to avoid, and the regional reason behind each window. If you store your rig in more than one region across a season, plan the work around where the rig will sit longest.
| Region | Best months | Months to avoid | Why |
|---|---|---|---|
| South Florida / Gulf Coast (FL, AL, MS, LA) | Nov-Apr | Jun-Sep | Daily afternoon thunderstorms + hurricane season block 48-hr dry windows |
| North Florida / Southeast (GA, SC, NC) | Mar-May, Oct-Nov | Jul-Aug | Mild shoulder windows; midsummer heat + humidity slow cure |
| Texas / Southern Plains (TX, OK) | Mar-May, Oct-Nov | Jun-Sep | 100°F+ surface temps in summer collapse the working window |
| Desert Southwest (AZ, NV, NM) | Oct-Apr | May-Sep | 110°F+ summer surface temps; winter is the actual repair season |
| Pacific Northwest (WA, OR coastal) | Jul-Sep | Oct-Jun | Persistent rain Oct-Jun; only summer offers consistent dry stretches |
| Mountain West (ID, MT, CO, WY) | Jun-Aug | Oct-May | Snow and freeze block work outside the brief post-thaw window |
| Midwest / Mid-Atlantic (IL, OH, IN, PA, VA) | May-Oct | Nov-Apr | Standard temperate window; cold blocks proper cure outside it |
| Northeast (NY, MA, CT, NH, VT, ME) | May-Oct | Nov-Apr | Standard temperate window; coastal humidity slows skinning Jul-Aug |
When is the best month to reseal an RV roof in your specific climate?
For temperate climates (Midwest, Mid-Atlantic, Northeast), the answer is May, June, September, and early October. Daytime highs land between 65 and 82 degrees, overnight lows stay above 50, and rain probability drops enough to give Dicor self-leveling lap sealant the 24 to 48 hour clean cure it needs. April and late October work in southern latitudes but get tight up north.
Those windows align with how rubber roofing chemistry actually behaves. EPDM and TPO membranes flex and adhere best when the surface temperature is between 50 and 120 degrees, and lap sealant skins over in roughly 4 to 8 hours at 70 degrees. Cooler than 50 and the cure stalls, hotter than 95 and the working time shrinks to minutes.
Florida coastal owners on the Fort Pierce and Vero Beach circuits should treat winter (December through March) as primary roof-repair season, not summer. Pacific Northwest customers in Bellingham get one good window from late June through early September. Local climate, not the calendar, is the real signal.
Why does temperature matter so much for sealant cure?
Temperature controls how lap sealant cross-links and how membrane adhesives bond. Below 50 degrees most polyurethane and silicone sealants slow to a near-stop and develop weak skins that crack within one freeze-thaw cycle. Above 95 the working time collapses, and the sealant skins over before it has a chance to flow into the seam.
Manufacturers publish narrow application bands for a reason. Dicor's lap sealant guidelines specify 50 to 100 degrees for application, with 60 to 80 producing the cleanest self-leveling flow. EternaBond and similar peel-and-stick membrane patches require a clean, dry surface above 40 degrees and lose tack instantly on damp or frosty rubber.
The roof surface itself runs hotter than the air. On a 90-degree afternoon, a black or dark-gray TPO membrane can read 140 to 160 degrees with an infrared thermometer. That is why A1 RV Repair crews start sealant work before 9 a.m. in summer and shade the work zone when the sun moves overhead.
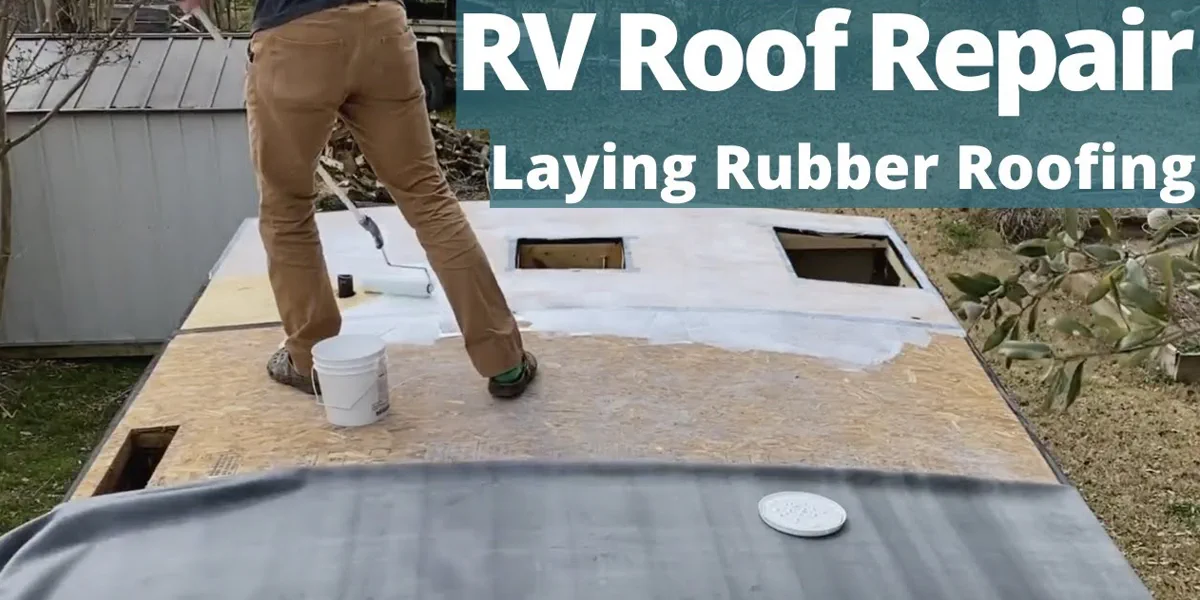
How long does an EPDM membrane reseal take?
An EPDM lap sealant reseal takes 4 to 8 hours of hands-on time on a 30-foot coach, plus 24 to 72 hours of cure before the rig is travel-ready. Full membrane replacement is a 2 to 4 day job because the old rubber has to come off, the wood substrate has to dry and be inspected, and the new sheet has to bond before any vents or A/C shrouds go back on.
Cure time is not application time. Self-leveling sealant is touch-dry in 4 to 8 hours but does not reach full mechanical strength for about 30 days. That matters most on roofs that will see vibration, washing, or storm exposure inside the cure window.
Dicor and similar OEM specs treat 70 degrees and 50% relative humidity as baseline. Drop the temperature to 55 and cure roughly doubles.
Add humidity above 70% and skinning slows further. EPDM Roofing Association technical data notes the same rule for commercial flat roofs, which is the same chemistry RV manufacturers borrow.
Spring vs fall: which is actually better?
Spring (April through May) and fall (September through October) deliver almost identical conditions, but they serve different goals. Spring repairs catch winter damage early and get ahead of the travel season, while fall repairs prep the coach for storage and stop water from sitting in cracks during freeze-thaw cycles. Both windows beat summer for sealant cure and beat winter for adhesion.
Spring work tends to expose more damage. UV degradation, ice dams, and rodent activity all leave winter signatures that only show up after a thorough wash and inspection. Booking an inspection by mid-March keeps the roof on the shop calendar before peak demand hits.
Fall work emphasizes prevention. Sealant joints, vent gaskets, and skylight perimeters get touched up so winter precipitation does not find a path inside. Owners storing in Port St. Lucie or other warm climates skip the freeze risk but still benefit from clearing summer UV damage.
Repair vs reseal vs full replacement: how do I choose?
Choose a spot repair when damage is isolated to one seam or vent. Choose a full reseal when lap sealant across the roof is cracked, chalky, or older than five years.
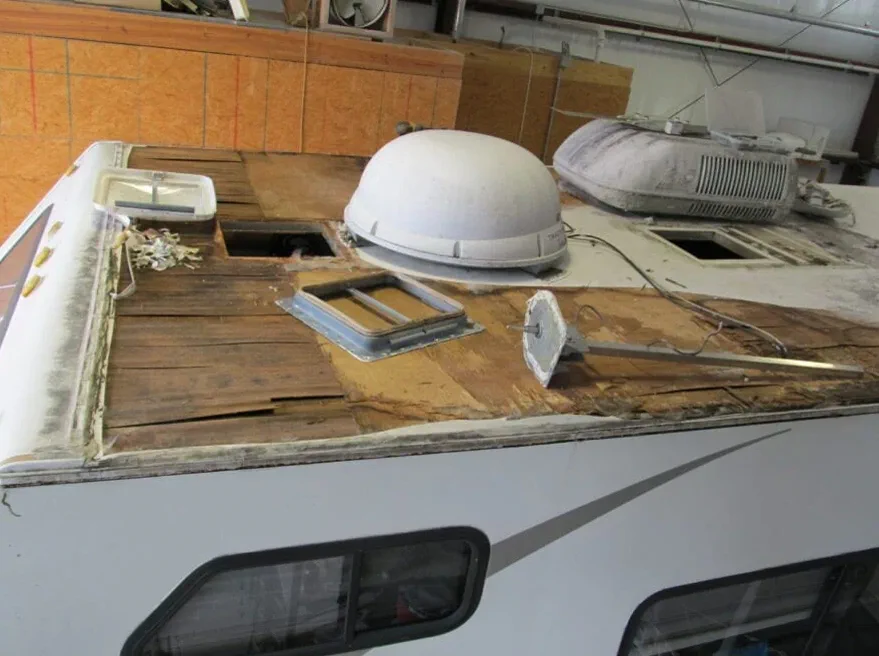
Choose full membrane replacement when the rubber itself is delaminating, the substrate is soft, or interior water staining is widespread. The cost gap between the three is roughly 1x, 4x, and 12x.
The table below shows typical ranges A1 RV Repair sees in 2026 for a Class A or large Class C coach. Smaller travel trailers and pop-ups land at the low end. Pricing assumes mobile service to your storage location with no shop drop-off required.
| Service | Typical Price Range | Best Season | Time on Site | Lifespan | When to Choose |
|---|---|---|---|---|---|
| Spot lap sealant touch-up | $185 - $350 | Apr-Oct | 1-2 hrs | 2-4 yrs | One vent or seam cracked |
| Single seam reseal | $300 - $650 | Apr-Oct | 2-4 hrs | 4-6 yrs | Localized leak, rest of roof sound |
| Full roof reseal (lap sealant) | $650 - $1,400 | May-Sep | 4-8 hrs | 5-7 yrs | Sealant chalky or 5+ yrs old |
| Roof recoat (liquid) | $1,200 - $2,800 | May-Sep | 1-2 days | 8-12 yrs | Membrane sound but UV tired |
| EPDM patch + substrate spot | $800 - $1,800 | Apr-Oct | 1 day | 5-10 yrs | Tear or puncture, dry decking |
| Full EPDM/TPO replacement | $3,500 - $7,500 | May-Sep | 2-4 days | 15-20 yrs | Delamination or wet substrate |
| Emergency tarp stabilization | $200 - $500 | Year-round | 1-2 hrs | 30-90 days | Active leak, weather hostile |
The lifespan column assumes proper application within the temperature window. A reseal done in February at 45 degrees will not hit its rated lifespan no matter who applied it. NRVIA inspection standards flag exactly this kind of off-season work as a recurring source of premature roof failure.
Does humidity affect curing as much as temperature?
Humidity matters most for skin time, less for ultimate strength. At 50% relative humidity and 70 degrees, Dicor self-leveling sealant skins in about 4 hours. Push humidity above 80% and that stretches to 8 to 12 hours, which means a longer dust-free window before the coach can be moved or covered.
For coastal owners, humidity is rarely below 60% even in dry months. The fix is not to wait for desert conditions but to time application around mornings when relative humidity drops 10 to 20 points off the daily peak. A wash-and-dry cycle the day before reseal also helps because trapped moisture under the membrane will not evaporate fast enough during cure.
Salt exposure compounds the issue. NOAA climate data shows that Atlantic and Gulf coast humidity averages 75 to 85% from June through September, which is workable but slows skinning. A1 RV Repair routes coastal jobs to early-morning slots and uses Dicor's faster-skin formulation when humidity is forecast above 80%.
Can RV roof repairs be done in winter months?
Winter RV roof repairs are limited to temporary stabilization in most of the country. Lap sealant chemistry stalls below 50 degrees, EternaBond peel-and-stick loses tack on cold or damp rubber, and EPDM adhesive will not bond properly to a cold substrate. The exceptions are coaches stored in heated indoor facilities and southern climates that hold daytime highs in the 60s.
What is possible in winter is targeted leak chase and tarp work. A torn membrane can be tarped and battened to keep the interior dry until April, and a vent crack can be patched with cold-cure butyl tape that buys 60 to 90 days. None of those are permanent fixes, and they should be planned that way.
Heated-shop repairs are an option in some markets. Bringing a coach indoors warms the membrane to working temperature and lets a full reseal happen mid-winter.
The catch is shop scheduling and the cost of moving a 30-foot rig in snowy conditions, which usually pushes owners to wait. Leak source identification in winter is still worth doing because it sizes the spring repair before peak demand hits.
What does an emergency roof repair cost vs a planned one?
Emergency RV roof repair runs 25 to 50% above planned-service pricing because of after-hours dispatch, weather risk, and the smaller window for proper application. A planned spring reseal at $900 turns into a $1,200 to $1,400 emergency response when it is called in during a thunderstorm. That premium covers the labor, not a markup on materials.
The savings move in both directions. Catching a soft spot in April for $400 prevents a $4,000 substrate rebuild in October when the same leak has rotted out the decking under a slide-out. Most full membrane replacements A1 RV Repair sees started as $200 spot-seal jobs that owners deferred for one season too many.
Insurance treatment is also different. Most coach policies cover sudden weather damage but not gradual deterioration, so an emergency tarp after a storm is reimbursable while a planned reseal is not. Documenting the storm event and getting a written cause-of-loss from the responding tech matters when the claim hits adjusters.
What if I travel between regions during the year?
For full-time travelers and seasonal snowbirds, the simplest rule is to schedule annual roof work for the climate the coach is moving toward, not the one it is leaving. A May reseal in Texas before heading to Yellowstone gives the membrane time to cure before alpine UV hits it. A January reseal in Fort Pierce before heading north for summer gives the roof a stable cure before the rig hits the road.
Altitude shifts the math too. Mountain-state owners at 5,000 feet or higher see UV exposure roughly 20% stronger than at sea level, which accelerates sealant breakdown and shortens reseal intervals from 5 years to 3 or 4. The same coach in Port St. Lucie at 12 feet of elevation will hold sealant noticeably longer than a sister rig parked in Denver.
RVIA technical bulletins and most manufacturer warranty terms assume seasonal alignment with the storage climate. If your rig spends 8 months in Vero Beach and 4 months in Boise, time the roof work for the longer-stay region (Vero, in this example - which means a January or February reseal, not May).
How do I plan a maintenance schedule that actually works?
A working RV roof maintenance schedule has four touch points per year: a spring inspection, a mid-summer wash and visual, a pre-storage reseal, and a winter monthly walk-around. The total time investment is under 6 hours of owner attention plus one professional service call, and it prevents roughly 90% of the leak-driven damage A1 RV Repair sees during its RV roof repair intake.
Pair roof work with adjacent systems. Skylights, vent fans, A/C gaskets, and antenna bases all share sealant joints, and resealing them on the same visit costs less than separate trips.
While the tech is on the roof, related systems like water pump condition and house battery health often get checked at the same time. Roof-mounted solar deserves its own inspection cycle because its mounting feet pierce the membrane.
Documentation closes the loop. Photographing the roof at every service call builds a year-over-year visual record that catches slow degradation.
RV Industry Association service guidance recommends the same approach for warranty and resale paperwork. Emergency RV roof repair remains available year-round for the calls that cannot wait.