What does wall delamination actually look like on an RV, and how do you know it's water damage?
Wall delamination shows up as soft spots, bulges, or visible gaps where the fiberglass or aluminum exterior has pulled away from the wooden frame underneath. Touch the suspect area - if it feels squishy, warm, or smells like mildew, water is trapped inside the cavity. You might see discoloration, peeling decals, or separation at seams around windows, vents, or roof transitions.
The wood frame inside absorbs moisture and swells, pushing the outer skin outward. We use a Tramex moisture meter to confirm water saturation levels - anything above 20% in the framing means the cavity is compromised. On a Jayco Jay Flight, we recently found delamination at the slide-out corner after a failed Schwintek seal; the owners noticed a soft spot the size of a basketball two weeks later.
Early detection saves money. A small delaminated area caught in month one costs $1,500 to repair.
Left untouched for six months, mold colonizes the cavity, the wood rots, and you're looking at $3,500+ in remediation and structural replacement. We've repaired dozens of Grand Design and Winnebago units where roof leaks - typically from aged Dicor sealant or missing fasteners - caused wall cavities to saturate.
The exterior skin doesn't fail overnight; water seeps in through micro-cracks, accumulates in the framing, and the weight and pressure gradually separate the bond. That's when the wall starts visibly bubbling.
Visual and tactile warning signs:
- Soft, spongy feeling when you press the exterior wall
- Visible bulge or ripple in the fiberglass or aluminum skin
- Peeling, discolored, or water-stained graphics and decals
- Mildew or musty smell near windows, slide-outs, or roof vents
- Separation or cracking at the seam where walls meet the roof line
- Interior drywall or wall panels pulling away from the frame
- Dark streaks or water rings on the outside surface
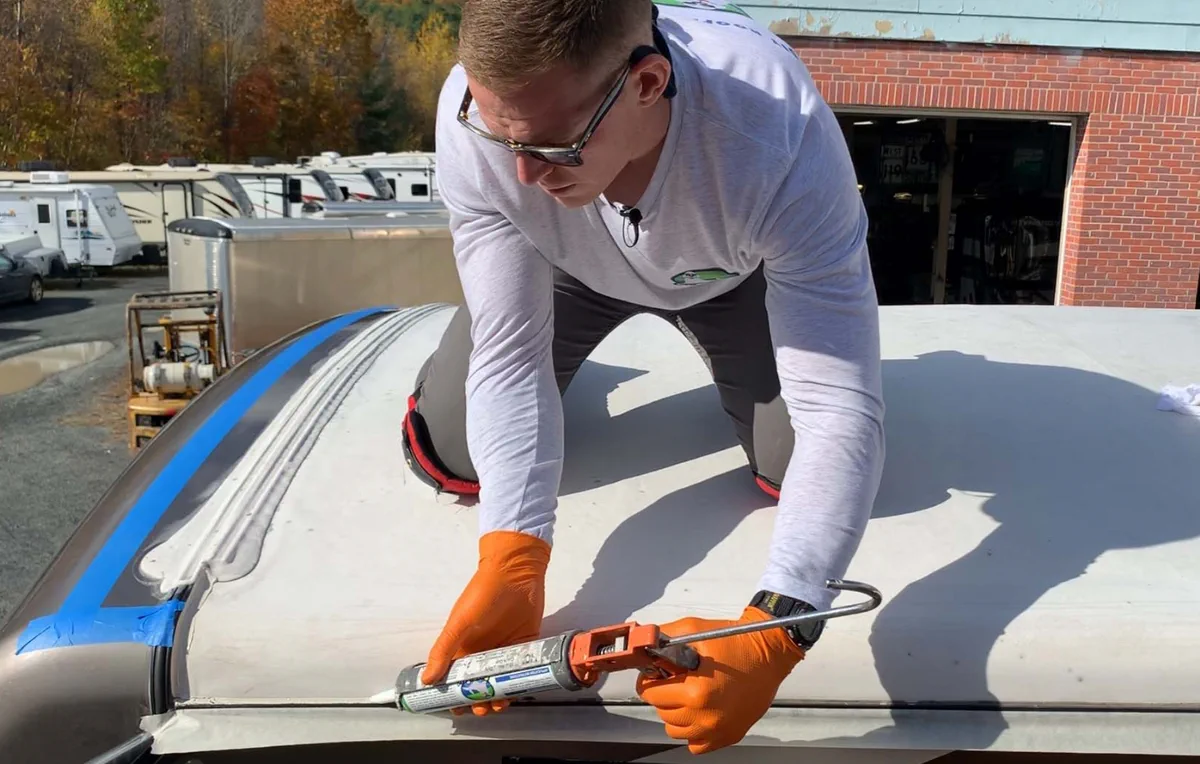
How does A1 diagnose the source leak and assess the damage inside the wall cavity?
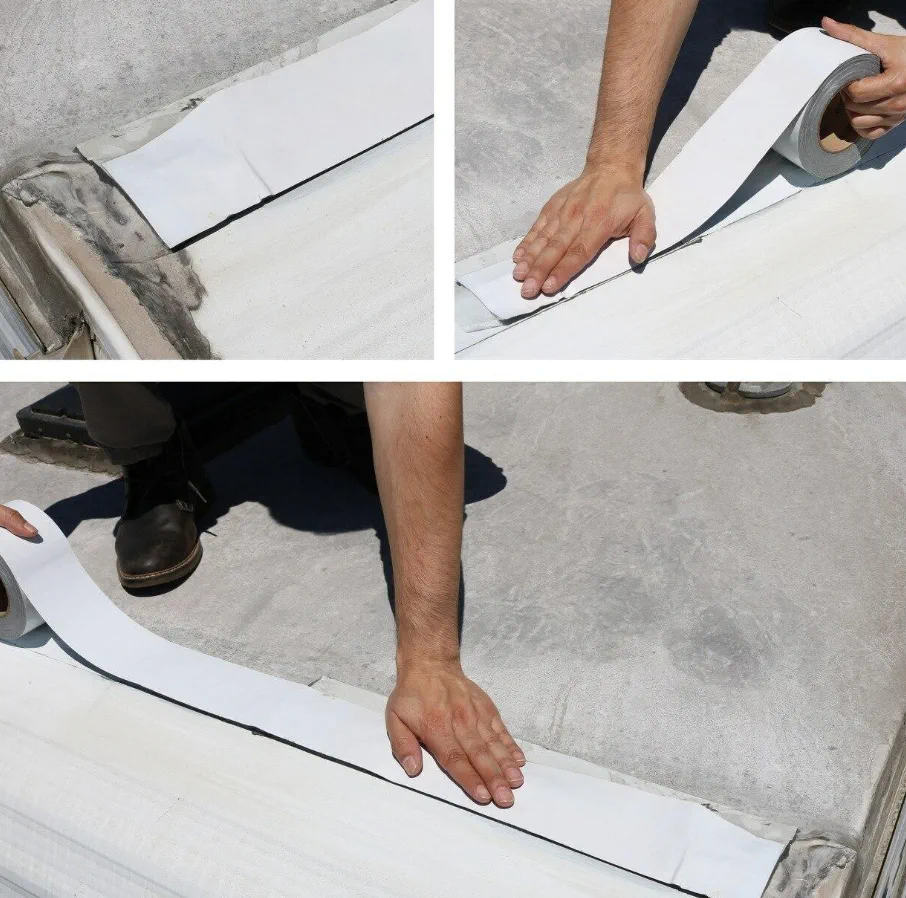
We don't just seal the delamination - we find and fix what caused it, or you'll be back in six months with the same problem. Step one is a wet-cavity inspection using a Tramex moisture meter and a thermal imaging camera to pinpoint water saturation levels inside the wall frame. We check the roof membrane (Dicor EPDM, TPO, or Eternabond tape), roof penetrations (Dometic and Coleman-Mach AC units, Lippert roof vents), window frames, slide-out seals (Schwintek or Lippert), plumbing vent stacks, and antenna bases.
Every common leak source on Forest River, Tiffin, and Coachmen units. Once we identify the source - say, a cracked window boot or a failed Dicor bead - we document it with photos and GPS coordinates so the repair plan is clear before we open the wall.
We recently serviced a Tiffin Allegro where the owner complained of a soft wall panel behind the bathroom. Moisture reading hit 35% in the cavity.
Thermal imaging showed a cold zone at the Dometic fresh-water intake fitting - a hairline crack in the plastic connector. The leak had been weeping for weeks.
We identified the source before cutting into the wall, then replaced the fitting and the compromised framing. If we'd just patched the outside without finding the intake failure, water would have returned within days.
Our diagnostic process:
- Tramex moisture meter testing of all suspect cavities
- Thermal imaging to locate cold/wet zones
- Roof membrane inspection under and around penetrations
- Window and door frame seal assessment with flashlight and probe
- Slide-out seal and motor area moisture check
- Plumbing and waste-tank vent stack inspection
- Documentation with photos and repair recommendation
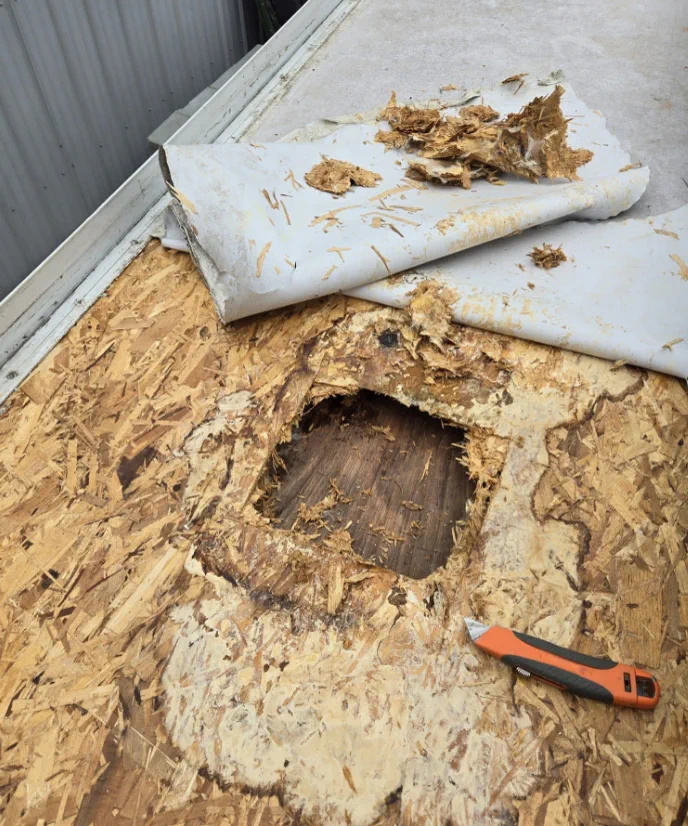
What's the actual repair process - how do you remove and replace delaminated wall sections?
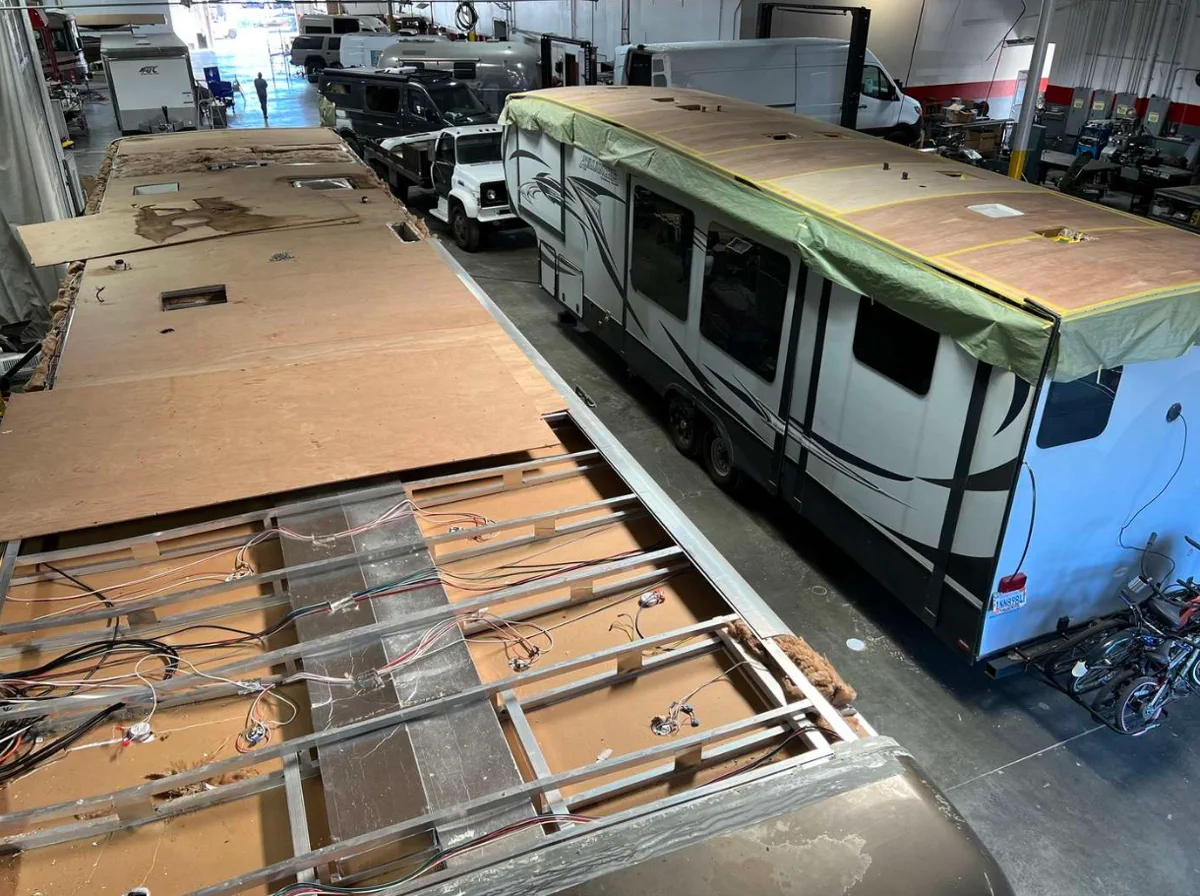
We cut out the damaged section using a oscillating saw, remove saturated framing, replace it with pressure-treated plywood or OEM Lippert components, then re-skin the exterior with fiberglass or aluminum. First, we mark the perimeter of the wet zone - usually 12 to 24 inches beyond the delamination to ensure all compromised wood is gone. We carefully remove interior cabinets, fixtures, and trim.
Then we cut and remove the outer skin (fiberglass or aluminum), strip the wet insulation and framing, dry the cavity with a dehumidifier and fans, and inspect for mold. If present, we remediate with an antimicrobial wash.
New pressure-treated frame members go in, sealed with Dicor 401UVA or equivalent. We re-insulate with closed-cell foam, install new exterior skin (fiberglass mat and resin, or aluminum panel), sand, prime, and paint or apply a UV-stable topcoat. Total restoration is typically 2-4 days for a 4x6 foot section.
A Keystone Montana owner had a failed roof seal that soaked the driver's-side wall above the main bedroom. The cavity was soft across a 5x4 foot area.
We removed the bedroom cabinets, cut out the compromised fiberglass skin, stripped 8 linear feet of wet 2x2 frame, replaced it with kiln-dried Douglas fir, applied new Dicor sealant, re-foamed with closed-cell, and re-skinned with fiberglass cloth and epoxy resin. Three days start to finish. The repair held for two years before the owner traded the unit - no recurrence, no smell, no structural issues.
Step-by-step repair sequence:
- Mark perimeter of wet zone with 12-inch safety margin
- Remove interior components (cabinets, fixtures, trim, insulation)
- Cut and remove outer wall skin carefully
- Strip saturated wood framing and inspect for mold
- Dry cavity thoroughly with dehumidifier and airflow
- Apply antimicrobial treatment if mold is present
- Install pressure-treated or kiln-dried replacement framing
- Seal new frame members with Dicor 401UVA sealant
- Install closed-cell foam insulation
- Re-skin exterior with fiberglass cloth and resin or aluminum panel
- Sand, prime, and paint or apply UV-stable finish
- Re-install interior components and test for leaks
What does wall delamination repair cost, and does the price change based on location or wall type?
Wall delamination repair runs $1,200 to $4,800 depending on the size of the damaged section, whether mold remediation is needed, and the complexity of the exterior finish. A small localized repair (2x3 feet, no mold, single-layer fiberglass skin) is typically $1,200 to $1,800. Medium repairs (4x5 feet, light mold, standard fiberglass) run $2,200 to $3,200.
Large repairs (6x8 feet, heavy mold, aluminum cladding, or structural framing replacement) hit $3,500 to $4,800. Our pricing is flat-rate and quoted by phone at (866) 623-1340 after we ask about the RV make, model year, affected area, and any visible mold.
We don't charge travel fees for mobile service in our covered metros - we come to you. Paint color matching and special finishes (gel coat, two-tone) add $200 to $400.
We quoted a Winnebago Adventurer with delamination on the wet bath wall - the cavity was 4 feet wide and 3 feet tall, with moderate mold and a Dometic water heater that needed relocation. The estimate was $2,600.
A Grand Design Solitude with similar damage but aluminum exterior cladding and a slide-out Schwintek motor in the affected area ran $3,800 because of the additional motor-seal disassembly and re-weatherproofing. Every unit is different, which is why we quote by phone - fast, no guessing.
What affects the final price:
- Size of damaged wall section (square footage)
- Degree of wood frame deterioration (minor rot versus structural failure)
- Mold presence and remediation scope
- Exterior finish type (fiberglass, aluminum, composite)
- Interior component relocation (cabinets, water heater, electrical)
- Insulation type and replacement requirement
- Paint color matching and topcoat finish
How long does wall delamination repair take, and can you do it while I'm using the RV?
Wall delamination repair takes 2 to 4 days for typical damage; you cannot safely occupy the RV during the work because we remove wall sections and use heat, solvents, and moisture-generating equipment. A small repair (under 3x4 feet, no mold) is often a 2-day job - we can sometimes finish overnight if the exterior finish is simple. Medium repairs (4x6 feet, light mold) take 3 days.
Large repairs or those involving slide-outs, roof penetrations, or heavy mold remediation take 4 to 5 days. We work mobile, meaning we arrive at your location in our covered metros with tools and materials.
On-site drying time - running dehumidifiers and fans - adds 12 to 24 hours to cure the new foam, sealant, and resin. Rush repairs are possible; we offer 2-4 hour emergency response in core service areas, but full completion still requires the material cure schedule.
A Coachmen Leprechaun owner in Tampa had a roof leak that delaminated the galley wall. We diagnosed it on Tuesday, quoted $2,200, and started Wednesday morning.
By Friday afternoon, the wall was re-skinned, cured, primed, and painted. The owner stayed in a hotel.
We stayed mobile - parked at his home, plugged into 30-amp shore power, and had water access for cleanup. If the damage had involved the bedroom and required cabinet removal and reinstallation, it would have been a 4-day project, but the galley-only scope meant faster turnaround.
Timeline factors and what delays repairs:
- Size and accessibility of the damaged section
- Whether interior components must be removed and reinstalled
- Mold remediation scope (adds 1 day if present)
- Weather conditions (rain delays fiberglass curing)
- Foam cure time (18-24 hours for closed-cell foam)
- Resin and paint cure schedules (varies by product)
- Availability of matching paint or exterior material
What replacement parts do you use, and will they last as long as the original wall?
We use OEM or equivalent-grade components: pressure-treated lumber, closed-cell polyurethane foam, fiberglass cloth and marine epoxy resin, Dicor sealant, and OEM exterior panels where possible. For structural framing, we source kiln-dried Douglas fir or pressure-treated lumber rated for moisture exposure - same specs as the original. Insulation is Dow Corning or equivalent closed-cell foam, which resists water absorption and won't collapse if re-exposed to moisture.
For exterior skin, we match the original: fiberglass cloth (not mat) embedded in marine-grade epoxy resin, or aluminum/composite cladding sourced from Lippert or OEM stock. Sealant is always Dicor 401UVA or equivalent - non-sag, UV-stable, paintable.
These parts are built to last as long as the original if the roof and seals are maintained. The weak point is not the repair - it's the leak source. If you don't fix the roof seal or window boot, a repaired wall will fail again in 2-3 years.
We repaired a Jayco Jay Flight delamination with OEM Lippert framing and fiberglass skin. The owner asked why not cheap plywood and resin.
We explained: cheap materials absorb water like a sponge, fail in 18 months, and cost you another $2,000+ to repair again. Marine-grade closed-cell foam and epoxy resin cost $300 more upfront but last 10+ years.
Three years later, the owner reported zero issues. The lesson: the repair is only as good as the source-leak fix and the material grade. We don't cut corners on either.
Component standards we use:
- Pressure-treated kiln-dried dimensional lumber (2x2, 2x4)
- Closed-cell polyurethane foam (2-2.5 lb density minimum)
- Marine-grade fiberglass cloth with epoxy resin
- Dicor 401UVA or equivalent sealant for frame sealing
- Exterior finish: paint, gel coat, or OEM cladding match
- Antimicrobial wash (if mold remediation required)
- Window and door seals: OEM Schwintek, Lippert, or equivalent