Signs you need leak source identification now
Four conditions point to hiring a meter scan rather than guessing at sealant. Catching the actual entry point saves the laminate underneath.
1. Stain that won't trace to a vent
You see a wet ring inside but no obvious vent or skylight above it. Water travels along rafters - the entry point is somewhere else. Tramex maps it cleanly.
2. Soft spot underfoot or wall flex
Substrate is already saturated somewhere. Pin-meter confirms how deep, IR shows how far it has spread. Repair quote follows the map.
3. Musty smell after rain
Active intrusion you haven't visually located yet. Pressure-isolation soapy water test on every seam and window finds the bubble.
4. Pre-purchase or pre-trip inspection
Buying used or heading out long-distance and want a clean baseline. Full envelope sweep + photo log gives you what dealer paperwork won't.
Leak source identification pricing
| Service | Equipment | On-Site Time | Flat Rate |
|---|---|---|---|
| Full envelope moisture map | Tramex pin + pinless | 60-90 min | $245 flat |
| IR thermal scan | FLIR thermal camera | 30-45 min | $185 flat |
| Soapy-water pressure isolation | Regulated water + soap | 45-90 min | $185 flat |
| Combined diagnostic + photo report | All three methods | 2-3 hours | $385 flat |
| Slide-out perimeter sweep | Tramex + visual | 30-45 min | $145 flat |
| Pre-purchase inspection | Full diagnostic + photo | 2-3 hours | $385 flat |
Equipment we bring to every diagnostic call
- Tramex pinless meter for fiberglass and gel-coat reads
- Tramex pin meter for substrate depth confirmation
- FLIR thermal imaging camera
- Regulated water supply for pressure-isolation testing
- Soap solution for bubble-bath leak ID
- Marked-up floor-plan templates for the photo report
How do you actually find where water is getting in?
Water always leaves a trail - our job is reading it. We start with a visual inspection of the roof, checking Dicor sealant condition, EPDM or TPO membrane integrity, and any visible gaps around vents or antennas. Then we move to the walls - looking for soft spots, discoloration, and delamination patterns that point backward to the source.
We use a non-invasive moisture meter to map wet zones inside walls and subfloor. If the leak is hidden or intermittent, we use thermal imaging to spot temperature differentials that indicate moisture accumulation.
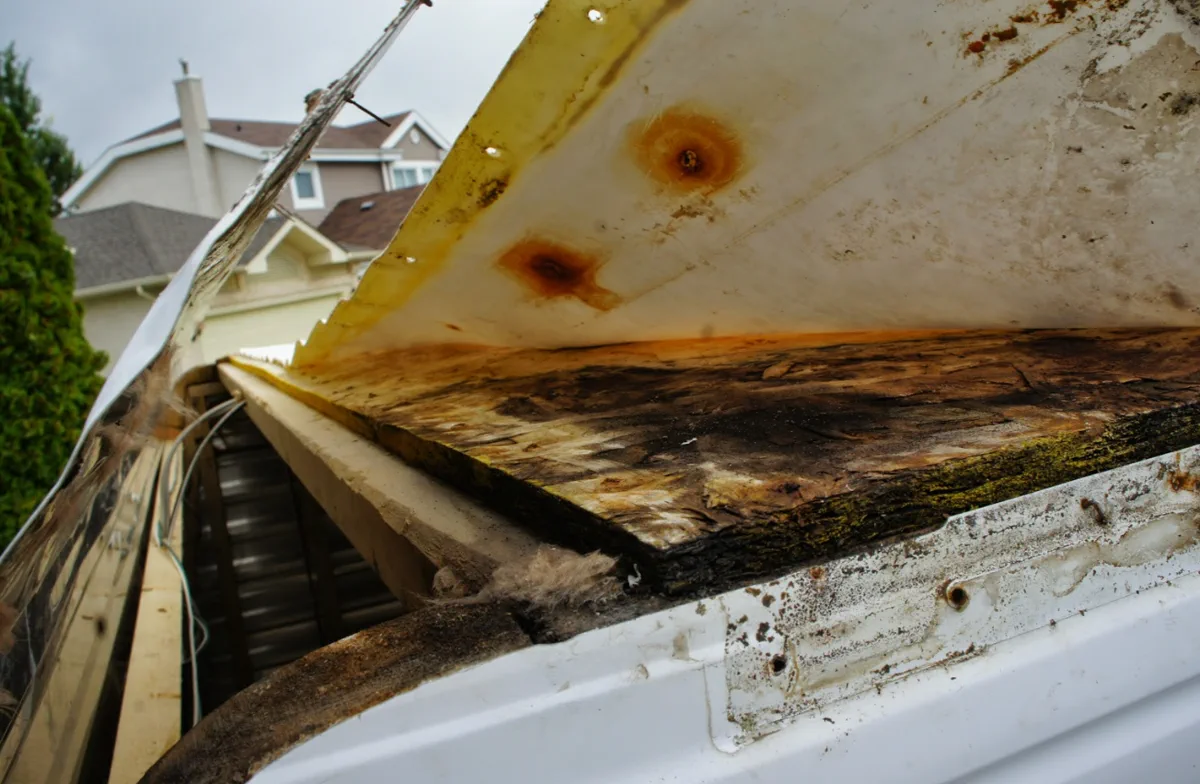
Most RV leaks cluster around five zones: roof penetrations, window frames, slide-out seals, plumbing vents, and exterior trim gaps. Once we locate the wet area, we trace backward to find the actual entry point - which is often 12-24 inches away from where you see damage.
We had a 2019 Jayco Jay Flight with ceiling staining near the bedroom slide-out. The owner thought the roof was the culprit.
We found the real problem: the Schwintek slide seal was degraded and rain was running down the inside of the wall cavity during heavy rain. The water was traveling down studs and pooling at the subfloor - exactly why the staining appeared on the ceiling below.
Moisture meter showed 45% humidity inside the wall cavity versus 12% outside. That's the smoking gun.
Once identified, the fix was straightforward: replace the slide boot, install a drip pan, seal penetrations. Without proper identification, the owner would have replaced the roof and still had water damage.
Diagnostic tools we deploy:
- Non-invasive moisture meters (wood and subfloor readings)
- Thermal imaging camera (detects cold/wet zones)
- Visual inspection of all exterior seams and trim
- Water spray test (controlled leak simulation if needed)
- Subfloor probe inspection (delamination mapping)
- Plumbing vent and duct inspection
- Slide-out boot and seal examination
What's the actual repair process after you find the leak?
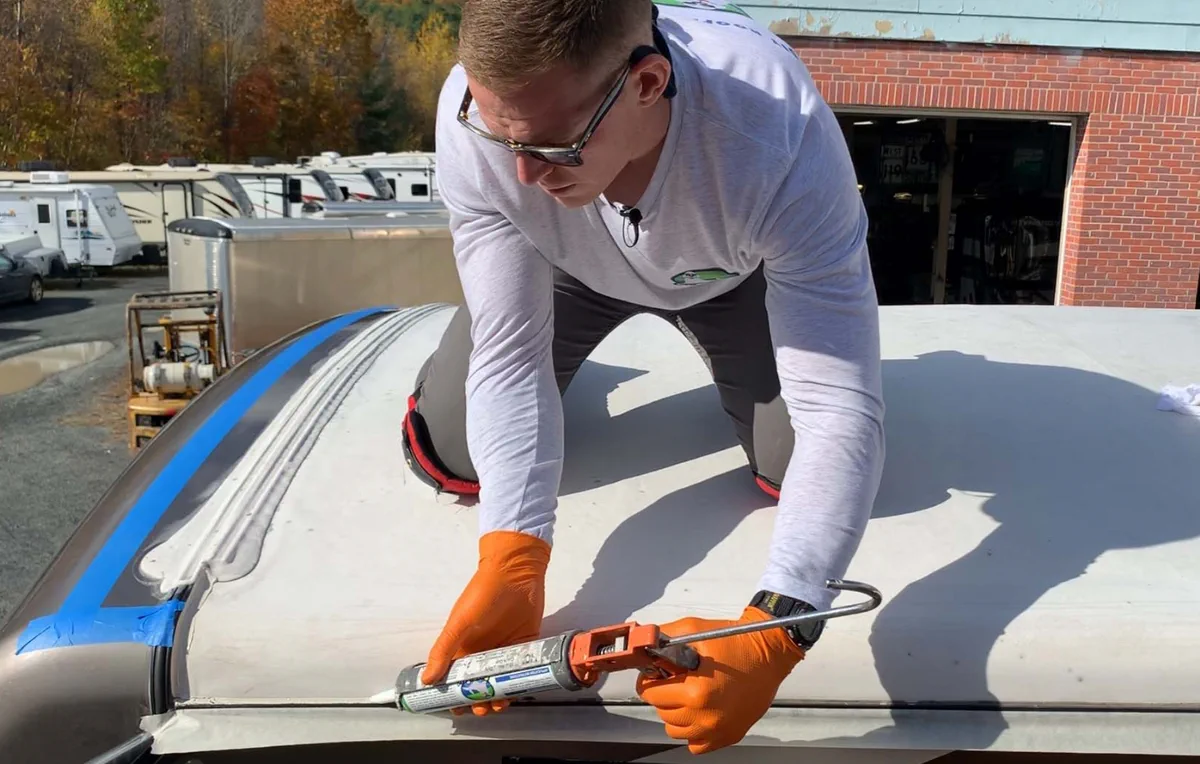
Identification is step one. Repair depends on what's broken. If it's a roof seal - we clean the area, remove old Dicor or sealant, inspect the membrane underneath, and re-seal with matching material (Dicor, Geocel, or roof-specific sealant per your RV manufacturer).
If a window frame is the culprit - we may re-seal the frame, replace the rubber gasket, or in bad cases, remove and re-set the window. Slide-out boot leaks require boot replacement and seal reapplication.
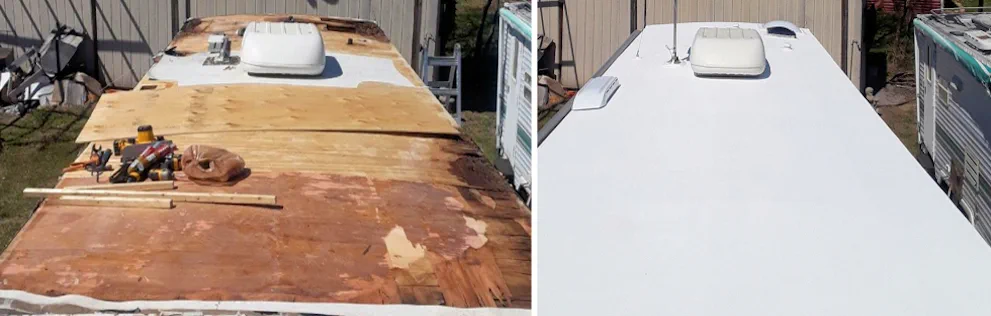
For subfloor damage - we remove wet material, treat for mold, replace with marine-grade plywood or Azdel composite, and seal underneath. Delaminated walls get opened, dried, mold-treated, and relaminated or patched with matching wall material.
We never cover a leak without fixing the source first. Patch-only fixes are how RVs end up totaled.
A 2017 Winnebago Adventurer came to us with a water-damaged subfloor near the bathroom. The owner had tried a tarp-and-seal approach with a competitor.
Six months later, mold had spread into the frame cavity and the entire floor was spongy. We identified a cracked Dometic plumbing vent collar as the original source.
We had to remove 20 feet of subfloor, replace with composite, treat framing, install a new vent collar, and rebuild the floor with new blocking. $3,800 repair instead of the original $400 seal-and-forget. We got it right the first time.
Repair scope by leak type:
- Roof penetration: seal removal, membrane inspection, re-seal with Dicor
- Window frame: gasket replacement or full window reset
- Slide-out boot: boot removal, frame inspection, boot replacement
- Plumbing vent: collar replacement, flashing seal, underside inspection
- Subfloor: removal of wet material, replacement with marine plywood or Azdel
- Wall delamination: opening wall, mold treatment, relamination or patch
- Ceiling panel: panel removal, frame inspection, new panel installation
What does leak identification and repair actually cost?
Identification alone runs $150 - $400 depending on RV size and leak complexity. A single-source roof leak on a 30-footer is $150. A multi-zone leak or hidden moisture situation on a 40-foot diesel pusher is closer to $400.
We quote the full repair cost by phone after diagnosis - no surprises. Actual repair costs vary wide: a simple roof seal is $300 - $600.
A window re-gasket is $400 - $800. Subfloor replacement starts at $1,200 for a 10-foot section and scales up.
Delaminated walls are $800 - $2,500 depending on how much wall needs opening and rebuilding. Mold remediation adds $300 - $1,000 if spore count is high.
We give you the total quote before we start. You can see the parts, labor hours, and material costs.
No dealer markup. No surprises at completion.
A 2018 Forest River Georgetown owner called with a vague "water smell" complaint. Identification took 90 minutes and cost $250.
We found a micro-crack in a Atwood water heater vent flange - slow drip, high mold risk. The repair - new flange, sealant, and mold treatment - was $520 total.
Owner authorized same day. Compare that to a dealer quote for the same issue: $1,800 because they'd have recommended subfloor replacement 'just in case.' We fixed the actual problem and the owner saved $1,280.
Typical pricing range (Florida/Idaho hubs):
- Leak identification: $150 - $400
- Roof seal repair: $300 - $600
- Window re-gasket or reset: $400 - $800
- Slide-out boot replacement: $500 - $1,200
- Subfloor replacement (per 10 feet): $1,200 - $2,200
- Wall delamination repair: $800 - $2,500
- Mold remediation treatment: $300 - $1,000
- Ceiling panel replacement: $400 - $900
Which parts and materials do you actually use?
We use OEM-compatible and proven aftermarket parts - no cheap substitutes. For roof sealing, we stock Dicor self-leveling sealant (the RV industry standard), Geocel Pro Flex, and TPO-compatible products depending on your membrane type. Window gaskets come from OEM suppliers matched to your specific frame.
Slide-out boots are Schwintek or Lippert originals - we don't mix brands on the same RV. Plumbing vents are Atwood or Dometic replacements with proper flanges. Subfloor replacement uses marine-grade plywood or Azdel composite (lighter, stronger, mold-resistant).
Drywall uses RV-grade moisture-resistant panels. We don't use house-grade materials - RVs move, vibrate, and flex.
Standard drywall fails in six months. We source parts in-house or from verified suppliers within 24 hours.
We repaired a 2021 Tiffin Allegro Red with a compromised roof. The owner had stopped at a roadside shop that used generic caulk - silicone, not Dicor - to seal a roof penetration.
Within two weeks, the seal failed in heat cycling. We removed all the bad caulk, cleaned to bare TPO membrane, and re-sealed with Dicor as the RV manufacturer specifies.
Same-day completion. We never cut corners on materials - it's the difference between a two-year seal and a ten-year seal.
Parts and brands we specify:
- Roof sealant: Dicor, Geocel Pro Flex, TPO-compatible adhesives
- Window gaskets: OEM matched to frame and year
- Slide-out components: Schwintek, Lippert, OEM sourced
- Plumbing: Atwood, Dometic (vents, flanges, traps)
- Subfloor: Marine plywood, Azdel composite
- Wall material: RV-grade moisture-resistant drywall
- Ceiling panels: Vinyl, laminate, or composite per original spec
- Fasteners and trim: Stainless or corrosion-resistant
How long does the whole process take from leak to fixed RV?
Identification: 1 - 3 hours. Repair: 4 hours to 5 days depending on scope. A simple roof seal - identification plus repair - is same-day turnaround, usually 3 - 5 hours total.
A window re-gasket is 4 - 6 hours. Slide-out boot replacement is 2 - 4 hours.
Subfloor replacement or wall delamination repair takes 2 - 5 days because we have to dry, treat, and let sealants cure properly. We don't rush drying - wet subfloors sealed too early trap moisture and fail.
Our emergency response in core our covered metros areas is 2 - 4 hours from your call. Rural locations add travel time. We coordinate scheduling by phone after diagnosis so you know exactly when we'll arrive and when your RV is ready.
A Keystone Cougar owner in Stuart had ceiling staining on a Friday. We identified a failed roof seal around a vent stack by 2 p.m., quoted $425, and completed the repair by 5 p.m. same day.
A Grand Design Solitude owner in Boise had subfloor damage requiring 15 feet of replacement. Identification was Monday morning.
We worked Tuesday - Thursday, dry time was Friday. RV ready Saturday. Clear timeline from the start - no hidden delays.
Typical timeline:
- Emergency response (core areas): 2 - 4 hours from call
- Leak identification: 1 - 3 hours on-site
- Simple repairs (roof seal, window): Same-day, 3 - 6 hours
- Moderate repairs (slide boot, vent): 4 - 8 hours, next day
- Major repairs (subfloor, wall): 2 - 5 days with cure time
- Rural travel time: Add 1 - 2 hours each direction
- All quotes given by phone before we start
What warranty backs the work after you're done?
90-day workmanship warranty on all leak repairs. If the area we sealed leaks again due to our workmanship, we come back and fix it at no charge. That's on parts and labor.
If a roof seal fails because of poor subfloor prep or improper sealant cure, we cover it. If a window re-gasket leaks because we didn't seat it right, we fix it.
What we don't cover: future damage from RV settling, frame stress, or new leaks in different locations. We also don't cover leaks caused by owner damage, improper maintenance, or use of non-approved repairs after we leave.
Your RV is your responsibility - we fix the leak we found and warrant that fix. Most leaks don't recur because we find the real source and address it.
The warranty gives you peace of mind in the short term. The thoroughness of our diagnosis gives you confidence long-term.
A 2016 Coachmen Apex owner had us seal a roof penetration in March. In May, during a heavy rainstorm, water appeared again - but it was coming from a different roof area that had developed a crack in the EPDM membrane.
That was a new leak, not our work failing. We identified and sealed the new source at diagnosis price only ($200) because it wasn't our repair failing.
The owner appreciated the honesty. Our 90-day warranty is legitimate - it's not designed to catch edge cases.
What's covered and what's not:
- Covered: Leaks from the specific area we sealed or repaired
- Covered: Workmanship failures within 90 days of completion
- Covered: Parts defects we didn't cause (with documentation)
- Not covered: New leaks in different RV locations
- Not covered: Damage from owner neglect or unapproved repairs
- Not covered: Structural damage beyond repair scope
- Not covered: Leaks from RV settling or frame stress
- Warranty period: 90 days from completion date